I found this Skull Shawl Pattern Free. As well as this Chart .
The Creator was very clever, created it back in April.
Since then i have been working on it, playing with it. It’s a lot of Fun 🙂
The pattern is written in Swedish and English. There are 2 methods work eyes first, or Work them in as you go. I worked them is as i went. You can find it down the Skull Shawl Pattern Page, Along with a Cheat Sheet when you get the hang of it.
I have made every mistake you could lol i feel your pain if your having problems getting pasted 3 working on the Shawl.
I discovered i made it too hard on my self, Mistakes i made~
So, i will save you some trouble, always increase on the 6th Chain across. Not the 5th or it will change your pattern and will not work right beyond. Check and Re check.
next, always check your chains to head ( if you ch 2 by mistake you will be frogging it shortly after. )
Make sure your ch 2, hdtr are there and chains are correct. ( starting chain ) or it will be lopsided.
All stitches need to be the same, not too loose, not to tight don’t change tension. or your shape will change on the Diamonds.
Check all your 4 dc make sure it’s not 5 or 3. unless working wrap where that changes.
Using the Pattern Created, i made my own Head Wrap and wanted to share it with you. 🙂
***If you have not worked the Skull Shawl Pattern, and would like to make the head Wrap You Will Need the link i posted above to start the Wrap. You will stop working on the link page at End of Row 14. ***
**** I used hdtr~ Half Double Crochet ,Rather than dtr~ Double Treble crochet****
This Wrap will pick up from here. You may still need to refer back to the pattern for help at first.
U.S. terms
What you will need ~
Hook and yarn of your choice. not a lot of yarn used here. a 7 oz, will give you more than one.
i used a H hook, and worst weight yarn.
Stitches Used~
Yo~ wrap yarn on hook.
ch~ Chain
sl st~ Slip Stitch
sc~Single crochet
dc~ Double crochet
(I used hdtr~ Rather than dtr~ Double Treble crochet)
hdtr ~ Half Double Treble ( Yo 3, put hook in loop , yo draw threw 2, yo draw threw 2, yo draw threw last 3.)
Now, as i said before you will need the link above. Work threw Row 14.
This picture shows the end of Row 14. (I am Left Handed by the way.)
this is a close up.
Here i have the skull head wrap folded in half.
It should look the same on both sides. Check it over make sure there are no mistakes.
Start~ with a sl st. This starts the Head Wrap Row 15
Next ch 3, work 3 dc in this first space. ch 2, 4 dc. look below at next picture to see it better.
work as you would 4 dc, ch 2, to center top ch 6, ( Rather than 9 or 8)

this picture shows the end of Row 15, and Start of 16. This Row 16: you will need work over that center ch 6, ( 4 dc, ch 2, 4dc )

This is a better look at Rows 15, 16, and the start of 17.

I made this Chart for help Row 15~19 to finish the skull head wrap.
Here is the picture with out the dots. So you can see the stitches. Remember i am left handed.
If your Right handed this may be backwards to you.
That is it, on the Skull Head Wrap cut and weave in ends. look below for more on this.
Back side of the Wrap measured 3 1/2 to 4 inches.
12 inches long.
20 inches for a head so it will stretch some if needed for a larger head.
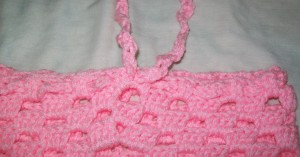
If you have a smaller head i made a tie for mine, ch 4, dc,* ch 3, dc, repeat* 52 total. cut weave in ends.
Your Finished Skull Wrap should look like this, if you use a tie like mine you can weave it in the spaces or in between the 2 dc in middle of 4. like i did.
Here is a close up. Tie in front between 2 dc, and threw the 2 middle dc around.
Here is the tie in front
Here is the Tie in back only threw the 2 middle dc of the 4.
This is your Finished Picture and how to put it on.
If you do not want it connected, Would Rather a button and loop.
you will need to stop the Increase on the sides, skip the ch 2, hdtr and ch 8. Starting at Row 15. instead repeat the ch 3, and ch 5, method for a flat Edge.
I think for smaller heads the Tie works Great in back.
You can even tuck the corner in back looks nice too 🙂
I have been Working a lot of Projects up with this Clever Pattern. I hope to Update this post soon with more of my work in This skull pattern. I hope you like this pattern and find it fun to make too. 🙂
If your a Face Book Fan you have seen some of them already 🙂
See you soon. Shell


